Did you know that finishing your basement can increase your home’s living space by up to 30%? Yes, you read that right! Turning your basement into a functional and welcoming area isn’t just about creating more room; it’s about adding significant value to your property. In this comprehensive guide on “How Do I Finish a Basement?,” we’ll walk you through the step-by-step process of transforming your underutilized space into a cozy and valuable asset.
Whether you’re envisioning a family entertainment zone, a home office, or an extra bedroom, this blog will provide you with all the essential information you need to get started on your basement finishing project. From planning and permits to insulation, drywall, and the final finishing touches, we’ve got you covered. So, let’s dive into the exciting world of basement renovation and discover how to unlock the hidden potential beneath your home.
Seal the deal with Zavza Seal and transform your home’s comfort and energy efficiency today!
Step1: Planning Your Basement Finishing Project
To answer your question, “How do I finish a basement?” it all starts with careful planning and clear goals. In this section, we’ll guide you through the essential steps to ensure a successful basement finishing project.
- Setting Clear Goals: Before you dive into the project, it’s crucial to define your goals. Are you looking to create a new living space, a home office, or perhaps a recreational area? Knowing your objectives will help you make informed decisions throughout the process.
- Creating a Budget: Finishing your basement is an investment, and it’s essential to set a realistic budget. We’ll show you how to assess your financial resources and allocate funds to different aspects of the project, including materials, labor, and permits.
- Establishing a Timeline: Time management is key to a smooth basement finishing project. Learn how to create a timeline that outlines each phase of the project, from initial planning to the final touches. Having a schedule in place will keep the project on track and ensure timely completion.
By carefully planning your basement finishing project, you’ll be well-prepared to tackle each step with confidence.
Step 2: Obtaining Necessary Permits
When it comes to finishing your basement in Long Beach, Queens, Brooklyn, Babylon, and the rest of Nassau and Suffolk counties it’s all about obtaining the necessary permits is a critical step in the process. In this section, we’ll explain the ins and outs of securing permits and why it’s crucial to adhere to local regulations.
- Understanding the Permitting Process: Navigating the permitting process can be daunting, but it’s a necessary part of ensuring your basement finishing project complies with building codes and safety standards. We’ll break down the steps involved and provide tips for a smooth application process.
- Emphasizing Local Regulations: Different areas may have specific regulations and requirements for basemeInspecting and Preparing the Basement
Before you can embark on the journey of finishing your basement, it’s crucial to begin with a thorough inspection and preparation process. This step ensures that your basement is ready to be transformed into a functional and comfortable living space.
Step 3: Inspecting Your Basement
Start by inspecting your basement for any existing issues that need attention. This includes:
- Moisture and Leaks: Check for signs of moisture, leaks, or water intrusion. These issues can lead to mold growth and damage your newly finished space. Address any leaks or moisture problems promptly.
- Structural Concerns: Examine the structural integrity of your basement. Look for cracks, foundation issues, or any structural concerns that may require repairs. It’s essential to address these issues before proceeding with the finishing work.
Step 4: Preparing Your Basement
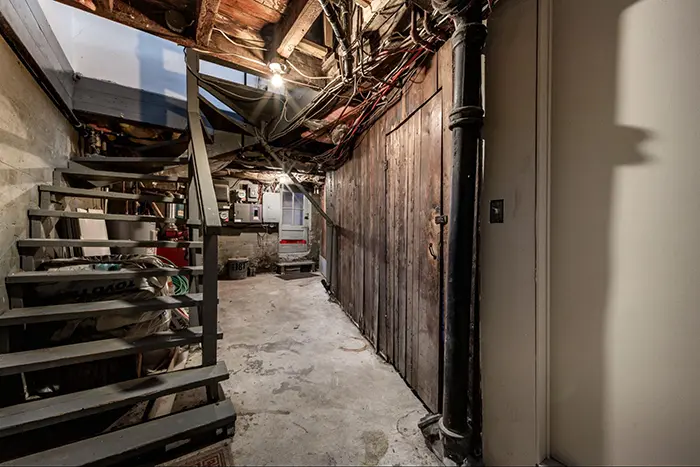 Once you’ve diligently identified and effectively addressed any existing issues or concerns within your basement, it’s time to embark on the crucial phase of preparing this space for the transformative finishing process.
This preparatory stage holds significant importance as it lays the foundation for the successful execution of your basement finishing project, ensuring that it will not only be aesthetically pleasing but also functional, comfortable, and durable for years to come.
This involves:
- Cleaning and Clearing: Remove any debris, clutter, or items that are no longer needed in the basement. A clean and clutter-free space is easier to work with.
- Utilities and Systems: Ensure that your basement’s electrical, plumbing, and HVAC systems are in good working order. If necessary, make any repairs or upgrades to these systems to meet the requirements of your finished space.
By taking the time to inspect and prepare your basement, you’ll create a solid foundation for your finishing project. This proactive approach helps you address potential issues upfront, ensuring a smoother and more successful transformation of your basement into a functional and inviting living area.
Step 5 – Framing and Insulation
Now that your basement is thoroughly inspected and prepared, it’s time to move on to the exciting phase of framing and insulation. This step is crucial in creating a comfortable and energy-efficient living space in your basement.
Step 6: Framing the Basement Walls
- Measure and Plan: Begin by measuring the walls and planning the layout for framing. Mark the locations for wall studs, taking into consideration any doors, windows, or other architectural features.
- Install Wall Studs: Using treated lumber, install wall studs according to your layout plan. Make sure they are securely anchored to the basement floor and ceiling.
- Frame Around Obstacles: If there are any obstacles like pipes or ducts, frame around them to maintain a consistent wall surface.
Insulate the Rim Joists: Before continuing with the framing, don’t forget to insulate the rim joists. This helps to prevent drafts and improve energy efficiency.
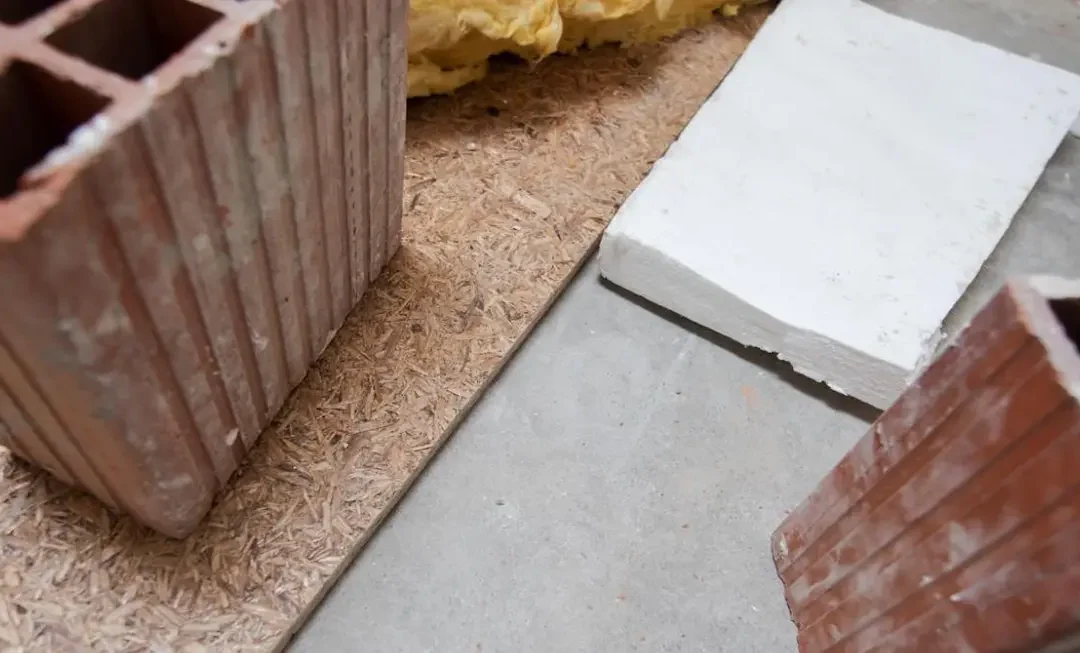
Step 7 – Types of Insulation and Installation
- Select the Right Insulation: Choose the appropriate insulation material for your basement. Common options include fiberglass batts, foam board, or spray foam insulation. Consider factors like moisture resistance and R-value when making your selection.
- Insulate Walls: Install insulation between the wall studs. Ensure a snug fit to maximize thermal performance. Seal any gaps or seams to create an airtight barrier.=
- Vapor Barrier: Depending on your climate, consider adding a vapor barrier to control moisture. This barrier should be installed on the warm side of the insulation.
- Insulate the Ceiling: If you plan to finish the basement ceiling, insulate it as well to enhance energy efficiency and soundproofing.
By framing your basement walls and choosing the right insulation materials and techniques, you’ll create a well-insulated and comfortable space that’s ready for further finishing touches. This step not only contributes to energy efficiency but also provides a sound structural foundation for your basement transformation.
Step 8 – Electrical and Plumbing Considerations
Now that your basement is taking shape, it’s crucial to consider the electrical and plumbing aspects of your finishing project. These are critical for creating a functional and safe living space.
Importance of Electrical and Plumbing Planning
- Safety First: Emphasize the importance of electrical and plumbing planning for safety. Proper electrical planning ensures that your basement has adequate lighting and power outlets. Plumbing planning ensures proper drainage and water supply for any fixtures.
- Compliance: Highlight the necessity of complying with local building codes and regulations when it comes to electrical and plumbing work. This ensures that your basement meets safety standards.
Hiring Professionals
- Licensed Electrician: Stress the significance of hiring a licensed electrician for any electrical work. A professional electrician can safely install wiring, outlets, and lighting fixtures to code.
- Qualified Plumber: Similarly, stress the importance of hiring a qualified plumber for any plumbing tasks. Whether it’s adding a bathroom or a utility sink, a professional plumber ensures that everything is properly connected and leak-free.
By addressing electrical and plumbing considerations with the help of professionals, you’ll ensure that your basement not only looks great but is also functional and safe.
Step 9: Drywall Installation
With the infrastructure in place, it’s time to move on to drywall installation—a significant step in finishing your basement.
Step-by-Step Drywall Installation Guide
- Measure and Cut: Begin by measuring your basement walls and cutting drywall sheets to fit. Make precise cuts for outlets, switches, and any openings.
- Attach to Framing: Secure the drywall sheets to the framed walls using drywall screws. Start from the top and work your way down, leaving a small gap at the bottom for expansion.
- Tape and Mud: Apply drywall tape over the seams and use joint compound (mud) to cover the tape and create a smooth surface. This may require multiple coats and sanding in between.
- Sand and Finish: Sand the dried mud to create a seamless finish. You’re now ready for primer and paint or other wall treatments.
By following these steps and ensuring proper mudding, taping, and sanding, your basement walls will have a professional and polished look. Don’t forget that this is also an opportunity to add insulation if you didn’t do so during the framing phase.
With the drywall in place, your basement is well on its way to becoming a fully finished and functional space.
Step 10 – Flooring Options
Choosing the right flooring for your finished basement is a critical decision. Here, we’ll explore various basement flooring options, their advantages, and disadvantages.
Carpet
Pros:
- Comfortable underfoot
- Provides insulation and soundproofing
- Comes in various styles and colors
Cons:
- Susceptible to moisture and mold
- May require regular cleaning and maintenance
Vinyl Flooring
Pros:
- Resistant to moisture and easy to clean
- Available in a wide range of designs
- Budget-friendly option
Cons:
- Not as comfortable as carpet
- May show wear over time
Laminate Flooring
Pros:
- Resistant to moisture and easy to clean
- Can mimic the look of hardwood or stone
- Durable and low-maintenance
Cons:
- May not feel as warm or comfortable as carpet
Engineered Hardwood
Pros:
- Offers a luxurious and timeless look
- More resistant to moisture than solid hardwood
- Can add value to your home
Cons:
- Higher cost compared to other options
- Requires careful installation to prevent moisture issues
Ceramic or Porcelain Tile
Pros:
- Highly durable and water-resistant
- Easy to clean
- Suitable for high-traffic areas
Cons:
- Can be cold underfoot
- Installation may be more complex
Step 11 – Painting and Finishing Touches
As you near the final stages of your basement finishing project, it’s time to focus on painting and adding those finishing touches that will make your space truly shine.
Process of Painting Walls and Ceilings
- Prepare the Surfaces: Begin by cleaning the walls and ceilings thoroughly. Repair any imperfections, such as cracks or holes, and sand them smooth.
- Choose the Right Paint: Select a high-quality paint that suits the function of the space. For basement walls, consider moisture-resistant paint to prevent mold and mildew.
- Use Proper Techniques: Apply paint using even strokes, starting from the top and working your way down. Use a roller for larger areas and a brush for corners and edges.
- Allow for Drying: Follow the recommended drying times between coats, and ensure the space is well-ventilated.
Importance of Finishing Details
- Trim and Molding: Installing trim and molding adds a polished look to your space. Choose styles that compliment your design.
- Lighting Fixtures: Consider different lighting fixtures to enhance the ambiance of your basement. Recessed lighting, pendant lights, or sconces can make a significant impact.
- Hardware and Accessories: Pay attention to the hardware on doors, cabinets, and any accessories like shelving or artwork. These small details can elevate the overall appearance.
By meticulously planning your basement finishing project, from flooring choices to the final coat of paint and finishing touches, you’ll create a space that’s not only visually appealing but also functional and comfortable.
Creating Functional Spaces
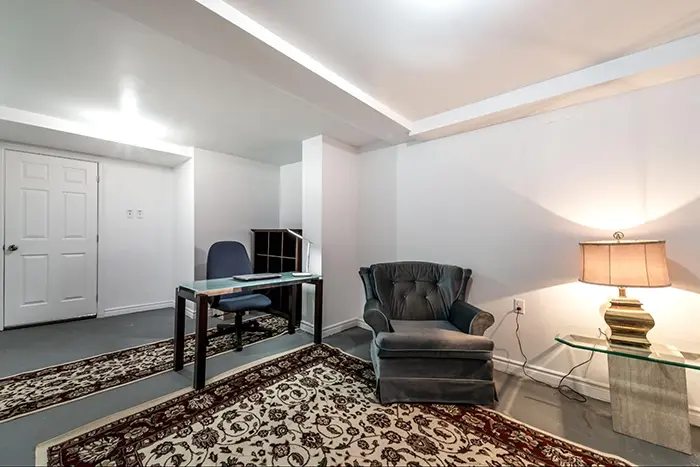 Now that your basement is fully finished, if you haven’t decided on what to use your basement for, it’s time to explore the exciting possibilities for creating functional and inviting spaces that suit your lifestyle.
Here Are Some Ideas for Ways You Can Use Your Basement:
Your newly finished basement is a blank canvas, ready to be transformed into a functional and inviting space. In this section, we’ll explore a multitude of creative ideas for making the most of your basement. Whether you envision it as a cozy family room, a productive home office, or something entirely unique, the possibilities are boundless.
Here are just a few popular choices:
- Family Room: Transform your basement into a cozy family room where everyone can gather for movie nights or game days. Consider plush seating, a large TV, and a dedicated area for board games or a gaming console.
- Home Office: Create a productive workspace in your basement by setting up a home office. Invest in a comfortable desk and ergonomic chair, ample storage, and good lighting to enhance your work experience.
- Guest Suite: If you frequently host guests, consider turning your basement into a welcoming guest suite. Include a bedroom, a private bathroom, and a sitting area for added comfort.
- Gym or Fitness Area: Stay active without leaving the comfort of your home by converting your basement into a fitness haven. Install gym equipment, mirrors, and rubber flooring for a motivating workout space.
- Entertainment Zone: Design an entertainment hub with a bar, mini-fridge, and a pool table or dartboard. This is perfect for hosting gatherings and entertaining friends and family.
After that, you want to spend some time designing the perfect space:
Furniture Arrangement and Decor
- Layout Planning: Depending on your chosen function, plan the layout carefully. Ensure that furniture is arranged for optimal traffic flow and functionality.
- Decor Elements: Use decor to define the style of your basement space. Warm colors and cozy textiles create a welcoming family room, while a sleek, minimalist design can elevate a home office.
- Lighting: Incorporate a mix of ambient, task, and accent lighting to set the right mood. Dimmer switches can provide flexibility and ambiance.
- Storage Solutions: Integrate storage solutions seamlessly into your design to keep the space organized and clutter-free.
How Do I Finish a Basement?: Final Thoughts
In this comprehensive guide on “How Do I Finish a Basement?,” you’ve learned the essential steps to turn your basement into a functional, comfortable, and beautiful part of your home. From planning and permitting to framing, insulation, and finishing touches, each phase is crucial to the success of your project.
Now that you’re armed with knowledge and inspiration, it’s time to embark on your basement finishing journey. Don’t hesitate to start creating the basement of your dreams—one that reflects your unique style and serves your family’s needs. Whether it’s a family room, home office, guest suite, or any other functional space, your finished basement has the potential to become a favorite part of your home.
When you need help protecting your basement with basement insulation or basement mold remediation, call on Zavza Seal and know first hand why our clients are going to cherish their dwellings for years to come!
Related Blog Posts:
- How Long Does the Restoration Process Take for Homes With Water Damage?
- What to Do If Your Home Has Water Damage?
- Signs of Water Damage in the Basement Walls
- Water Damage & Mold: Everything You Need To Know in 2023
- Things You Should Know About Water Damage
- Who Do I Call After My House Has Water Damage Restore?
- What Causes Water Damage to Floors and Walls
Related Services:
Our service areas:
Get A Free Estimate