In Long Island, a damp basement isn’t just an inconvenience, it’s often the first warning sign of serious structural damage and potential health hazards. Our unique coastal climate, fluctuating water tables, and seasonal storms mean concrete walls face relentless moisture pressure year-round. Left unprotected, tiny pores in the concrete act like sponges, pulling in water and vapor that can lead to mold growth, crumbling foundations, and costly repairs.
This guide is your comprehensive resource on moisture barriers, what they are, how they work, and the proven methods that deliver lasting protection in our region’s challenging environment. Whether you’re a homeowner safeguarding your biggest investment, a contractor ensuring code-compliant work, or an investor preserving property value, you’ll find clear, actionable insights here.
Don’t Let Water Damage Cost You More Money! Schedule Your Free Expert Inspection with New York’s Leading Waterproofing Contractors Now!
Understanding Moisture and Concrete Walls
Concrete may feel solid, but it’s naturally porous. The problem with that, is that the tiny interconnected capillaries allow water to travel through the wall. If you live in a coastal area like Long Island, or a flood-prone area, constant exposure to moisture and seasonal temperature extremes accelerate the breakdown of concrete, causing cracks to widen, surfaces to spall, and structural integrity to weaken over time.
Water can enter concrete in two main ways:
- Vapor Diffusion: Vapor diffusion is when water vapor naturally moves through porous materials from areas of high humidity to low humidity, even without visible leaks.
- Capillary Action: Capillary action is when liquid water gets “pulled” through the concrete’s microscopic channels, often from saturated soil or standing water.
Once inside, moisture can trigger a number of issues:
- Efflorescence: Efflorescence is the formation of white, powdery mineral deposits that appear as water evaporates and leaves salts behind. It can also cause
- Mold Growth: Mold growth is the development of harmful mold colonies inside walls, which damage materials and affect indoor air quality.
- Structural Weakening: Structural weakening is when freeze-thaw cycles or long-term saturation expand cracks and compromise the wall’s strength.
In many of the neighborhoods across Long Island, Brooklyn, Queens, and The Bronx, where groundwater levels can rise quickly after storms because there’s not enough soil to soak it up fast enough, the movement of moisture through concrete is even more unpredictable. Different climates influence not just how moisture moves, but also where it concentrates, meaning solutions must be region-specific.
Here’s the problem:
Your concrete foundation has a lot of weight sitting on it. Foundation problems and basement moisture problems can only get worse. Then, what seems like small issues can evolve into costly repairs when water infiltrates deeper into the wall or spreads to framing, insulation, and finished spaces.
Why Moisture Barriers Are Important to the Life of Your Home
Unchecked moisture doesn’t just stain walls, it can silently erode your home’s structure, comfort, and value. Without a barrier:
- Wood Rot: Wood rot is the decay of framing members, which weakens the home’s structural integrity.
- Mold Spores: Mold spores are microscopic particles that spread through the air, harming indoor air quality and triggering allergies or asthma.
- Saturated Insulation: Saturated insulation is insulation that has absorbed water, losing its thermal resistance and driving up energy bills.
- Reduced Property Value: Reduced property value is the financial loss caused when inspection reports flag water damage during a sale.
In Long Island’s flood-prone zones and neighborhoods with high water tables, the stakes are even higher. Storm surges and heavy rains can push water against your foundation for days at a time. A properly installed moisture barrier creates a protective shield, keeping liquid water and vapor from penetrating, while safeguarding insulation, structural elements, and the air you breathe.
It’s not an optional upgrade, it’s a necessary investment that pays for itself by preventing thousands in future repairs and health-related costs.
Moisture Barrier vs. Vapor Barrier – Clearing the Confusion
These two terms are often used interchangeably, but they serve different purposes:
- Moisture Barrier: A moisture barrier is a low-permeability membrane applied to the outside of foundation walls to block liquid water from entering.
- Vapor Barrier: A vapor barrier is a material installed on the warm side of a wall assembly to slow the movement of water vapor through building materials.
The difference comes down to Permeability: Permeability is the measure of how much water vapor can pass through a material, classified into three categories:
- Class I: Class I is an impermeable material such as polyethylene sheeting.
- Class II: Class II is a semi-impermeable material such as kraft-faced insulation.
- Class III: Class III is a semi-permeable material such as latex paint.
In Long Island’s mixed-humid coastal climate, choosing the right combination of barrier type and permeability class is critical. Put the wrong barrier in the wrong place, and you can actually trap moisture inside walls, making problems worse. This is one reason having a reputable and experienced contractor like Zavza Seal LLC is recommended if you want long-lasting results.
For The Best Quality Work and The Longest Warranties Possible, Long Island Homeowners Can Depend on Zavza Seal!
Call (631) 980-1800 Now to Schedule Your Free Assessment!
Where Moisture Barriers Belong
Moisture barriers aren’t one-size-fits-all, placement depends on the moisture source, wall assembly, and local climate. Done correctly, barriers stop water before it becomes a problem. Done wrong, they can trap moisture and create hidden damage.
- Basement Floors: Placed directly under the slab to block vapor from migrating upward. In existing basements, interior coatings can be applied before flooring.
- Crawl Spaces: Installed over soil (as a continuous ground cover) and up the walls to seal out ground moisture.
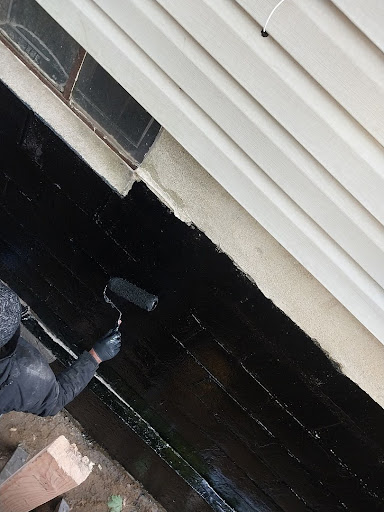
- Exterior Foundation Walls: Applied on the side facing the moisture source, usually paired with footing drains for maximum protection.
- Under Flooring: Used beneath hardwood, laminate, or tile in moisture-prone areas to prevent warping and mold.
In mixed-humid climates like Long Island’s, seasonal humidity swings matter. A good rule of thumb is to place vapor barriers on the warm side of the assembly during the dominant humidity season, but the exact approach changes depending on whether summer or winter moisture is the bigger threat. That’s why a site-specific inspection is critical before deciding barrier placement.
Types of Moisture Barrier Materials
Several moisture barrier options are available, each with unique strengths, costs, and installation considerations. Choosing the right mix for Long Island’s high water tables and coastal climate is key.
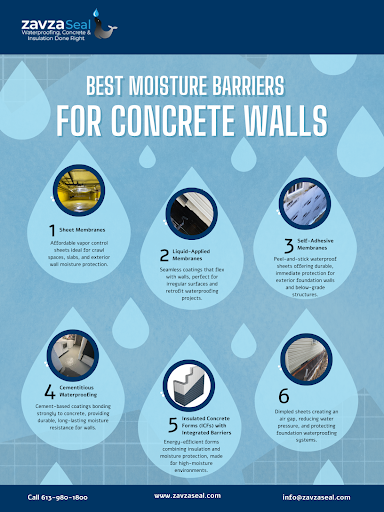
- Sheet Barriers (Polyethylene, Builder’s Foil):
Pros: Affordable, good vapor control, covers large areas quickly.
Cons: Can tear, requires careful seam sealing. - Liquid-Applied Membranes:
Pros: Seamless coverage, flexible, ideal for irregular surfaces.
Cons: Requires proper curing and surface prep - Self-Adhesive Membranes:
Pros: Strong adhesion, immediate waterproofing, long-lasting.
Cons: Needs smooth, clean surface, higher material cost. - Insulated Concrete Forms (ICFs) with Integrated Barriers:
Pros: Combines insulation and moisture protection, extremely durable.
Cons: Suited for new construction, higher upfront investment.
Professional guidance ensures the selected material matches the building’s structure, soil conditions, and climate demands.
Moisture Barrier Installation Best Practices
Even the best materials fail without proper installation. A well-placed, well-sealed barrier is the result of methodical preparation and execution.
- Surface Preparation: Clean and dry all surfaces, removing efflorescence and dirt before installation.
- Crack Repair: Seal cracks with hydraulic cement or epoxy before applying the barrier.
- Seam Overlap and Sealing: Overlap sheets by at least 6 inches and seal with compatible tapes or adhesives.
- Drainage Integration: Tie barriers into footing drains, sump pumps, or drainage boards for proper water redirection.
- Correct Side Placement: Always face the barrier toward the moisture source, placing it wrong can trap water inside.
- Protection During Backfill: Use protective boards or mats to prevent punctures.
Cutting corners here is the fastest way to waste money. Skilled installers follow manufacturer specs, local codes, and proven waterproofing practices every time.
Interior vs. Exterior – Lessons from Building Science
One of the biggest misconceptions in basement waterproofing is that plastic vapor barriers on the inside walls will solve moisture problems. In reality, this approach can backfire, trapping moisture inside the wall assembly, feeding mold growth, and accelerating decay.
Building science experts recommend exterior waterproofing as the first line of defense, combined with rigid foam or closed-cell spray foam insulation on the interior. This allows the wall to dry inward while still blocking bulk water from the outside.
Equally important are capillary breaks, materials that stop water from wicking up into the foundation, and drainage layers that relieve hydrostatic pressure. These systems work together to keep the wall dry, stable, and structurally sound.
This method isn’t just theory, it’s the reason Zavza Seal’s installations perform for decades, even in Long Island’s flood-prone, high-moisture environments.
Choosing the Right Contractor – Value Beyond Price
Hiring the right waterproofing contractor is about more than just finding the lowest bid, it’s about securing the expertise, materials, and workmanship that will protect your property for decades.
A true professional should check every box:
- Training and Certifications: Look for teams certified in industry-standard waterproofing methods.
- Thorough Inspections: They should assess both the interior and exterior for all possible moisture entry points.
- Quality Materials: Proven products rated for Long Island’s demanding climate ensure long-lasting performance.
- Clear Warranty Policies: Strong, transparent warranties on both labor and materials protect your investment.
- Custom Solutions: Every property is unique; your barrier system should be designed to match your exact conditions.
Zavza Seal LLC strikes the ideal balance, fair pricing without cutting corners, using the highest-quality materials, and delivering craftsmanship built to last in even the harshest coastal conditions.
Get a Free Moisture Assessment Today! Expert Moisture Barrier Installation for Concrete Walls in Long Island!
The sooner you address moisture problems, the more you save in repair costs and protect your home’s health. Our experts will evaluate your property, explain the best solutions, and provide a clear plan at no cost or obligation.
Call (631) 980-1800 or fill out our quick online form to schedule your free moisture assessment today. With competitive pricing, long-term warranties, and proven local expertise, Zavza Seal LLC makes protecting your home a risk-free decision. Acting now means lasting comfort, safety, and value.